
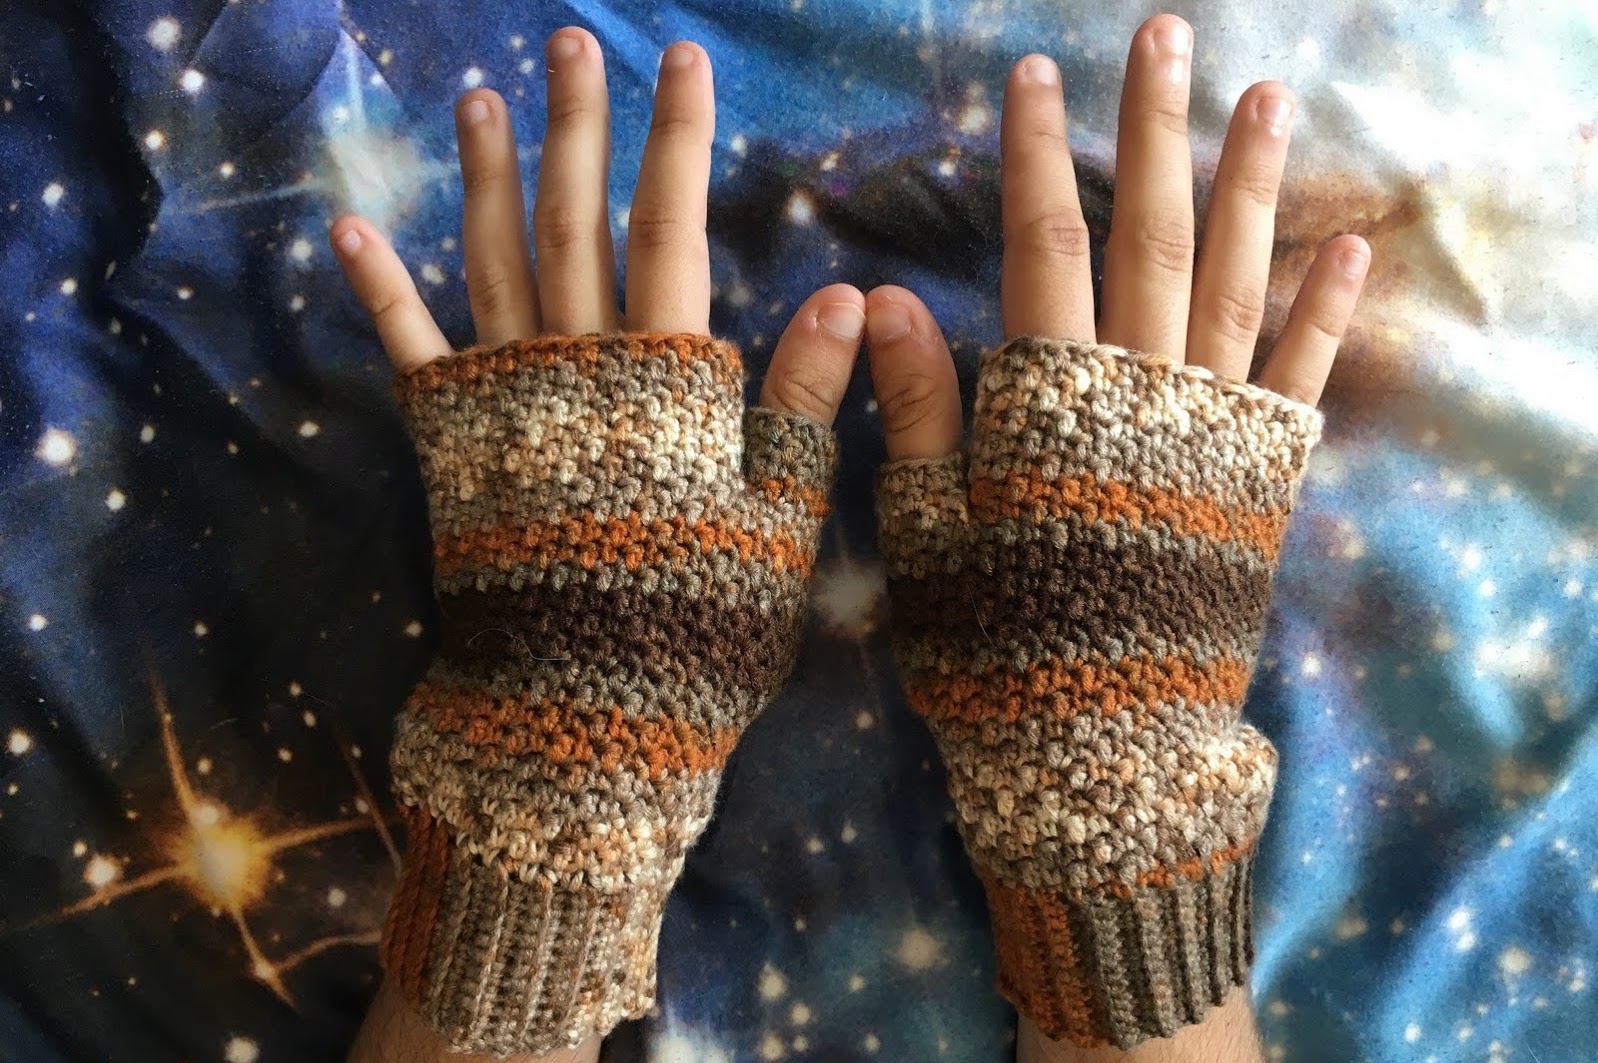
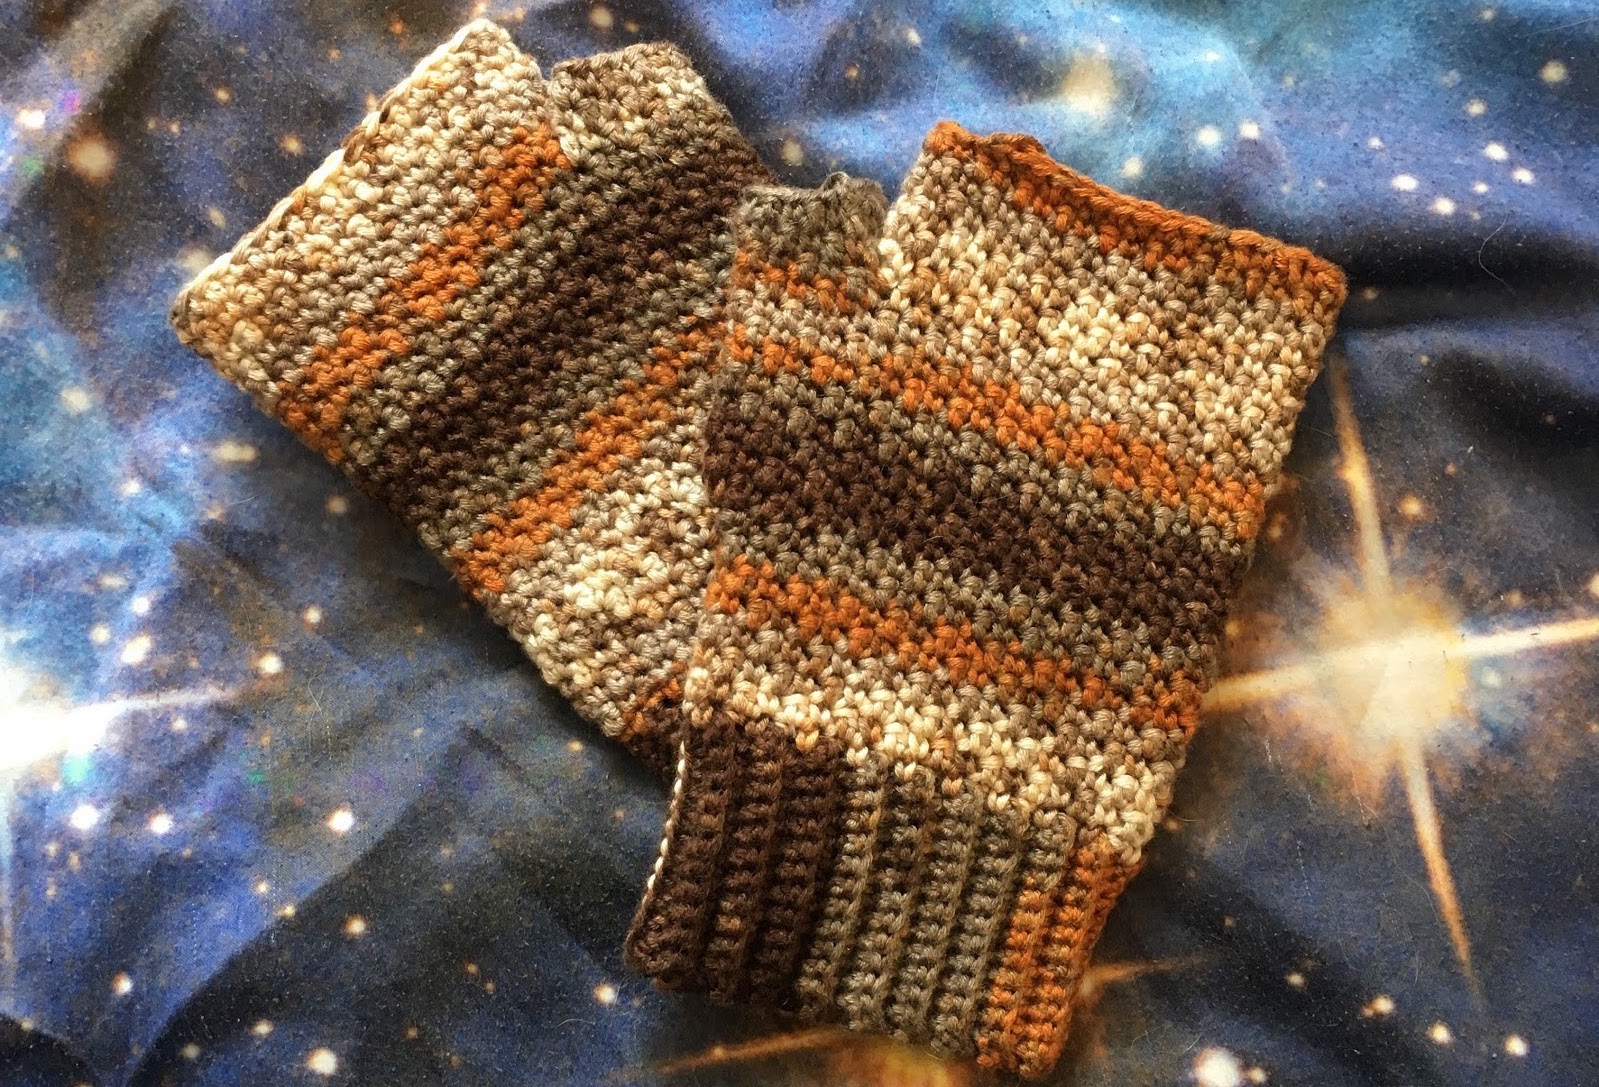
New free pattern: quick and cozy griddle stitch mitts to get ready for fall! Keep reading for the pattern and an introduction to the griddle stitch.
Despite the date, it was a whopping 92 degrees in Washington DC yesterday. I’ve been begrudgingly sipping iced coffee instead of steamy cappuccinos, but I refuse to put off my cold weather crafting any longer! So I whipped up these fingerless mitts, and hopefully cool and crisp fall weather will soon follow.
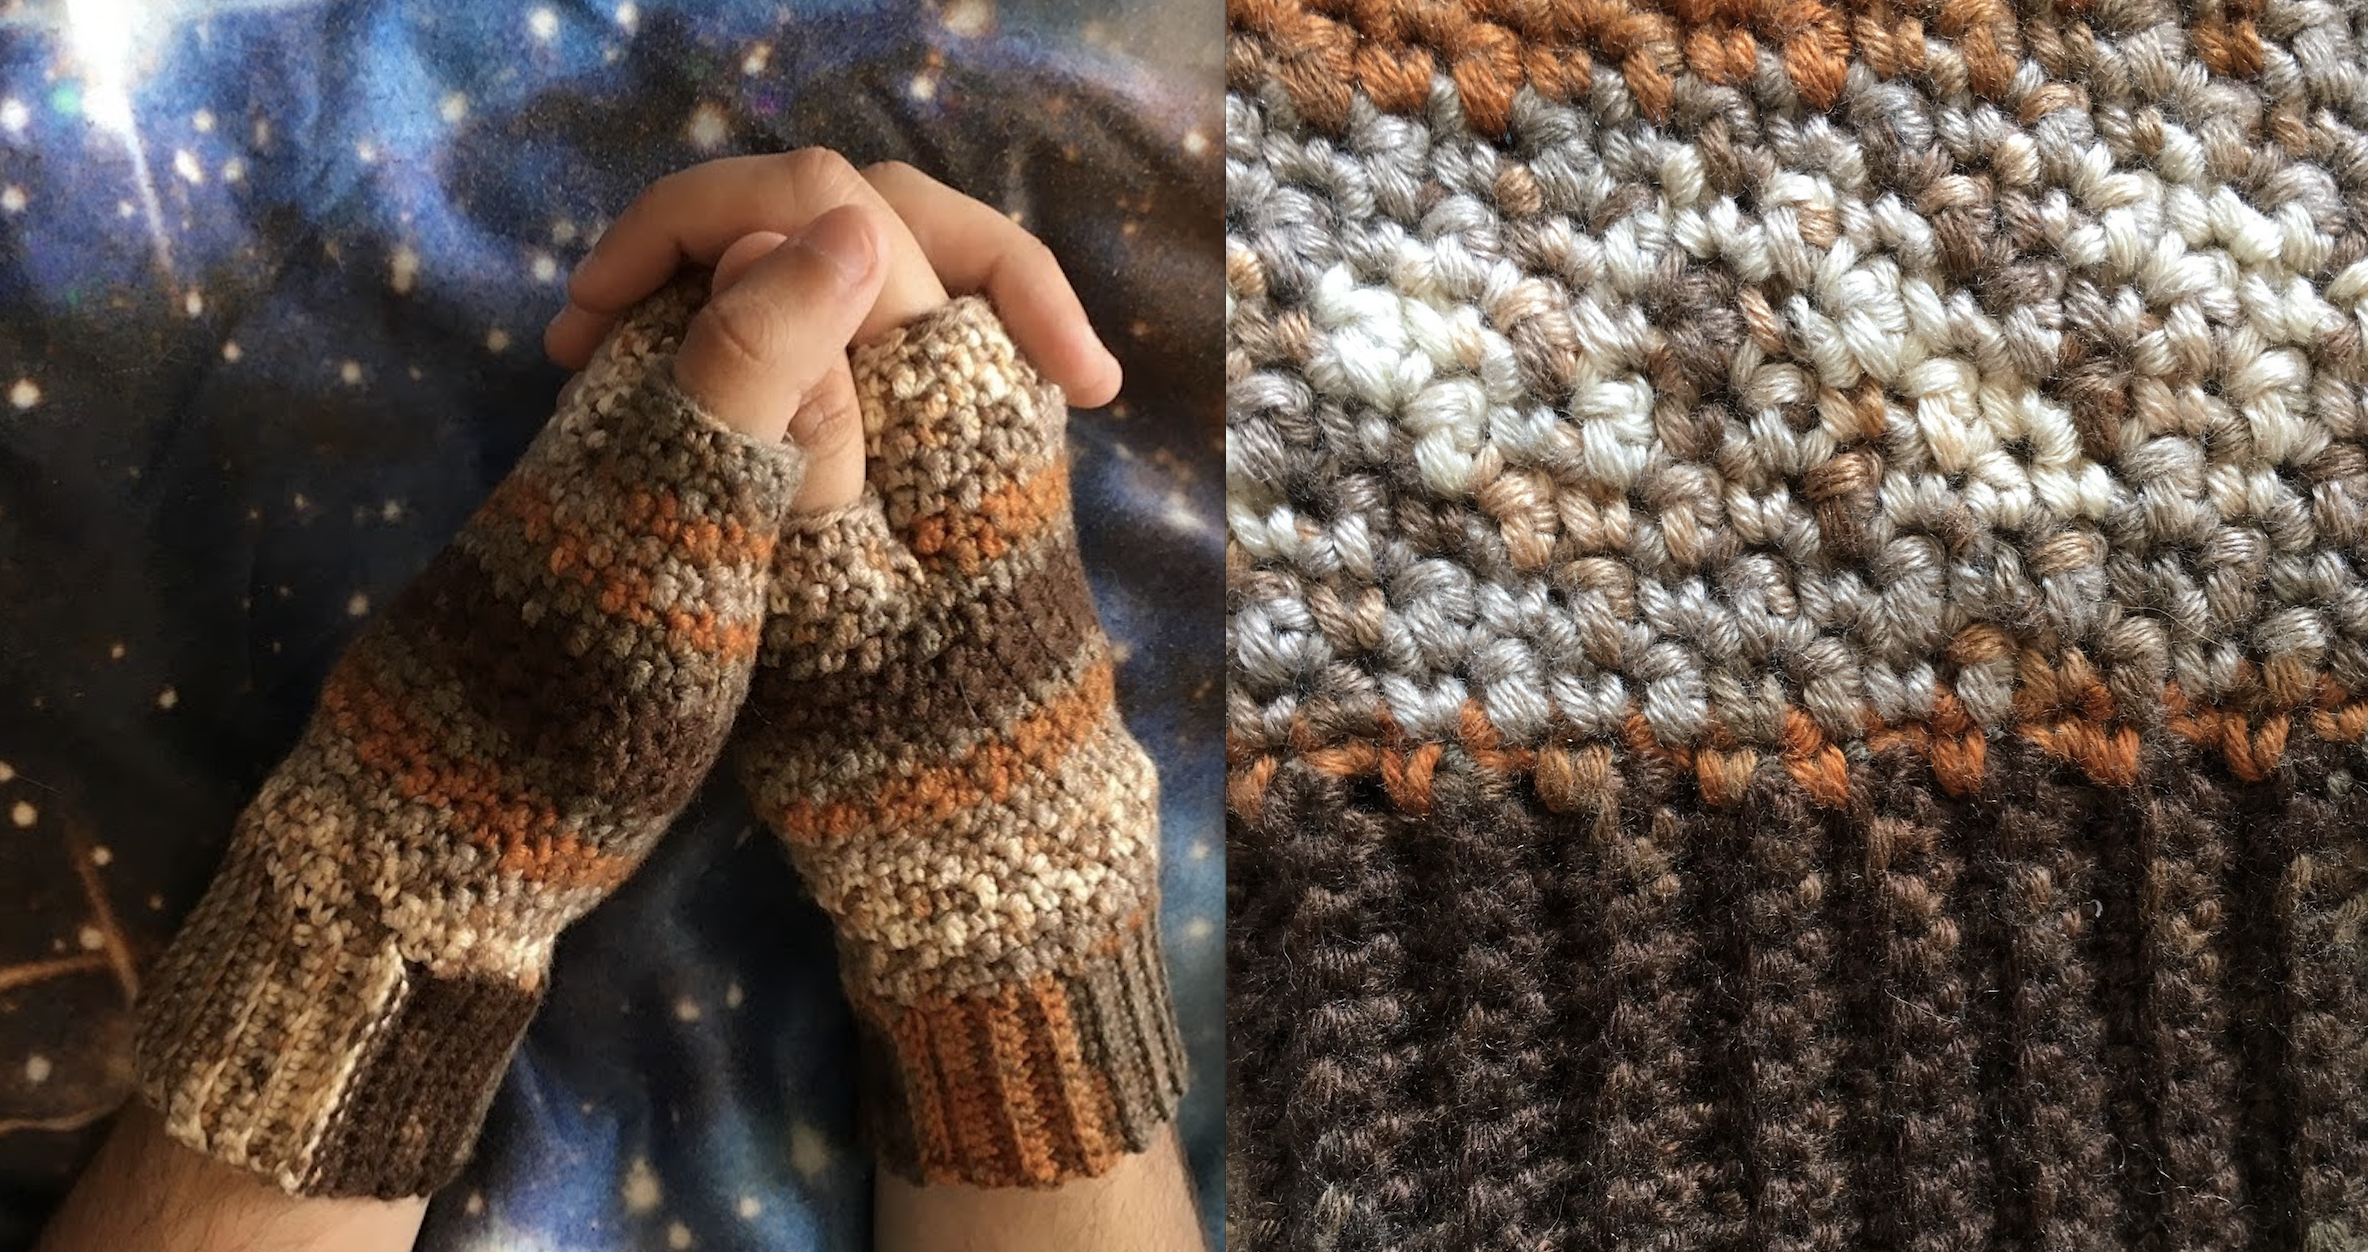
The main part of these mitts is crocheted with the griddle stitch, which is a stitch pattern where you alternate sc and dc stitches, swapping the order each row. It makes for a really beautiful fabric where the rows are almost indistinguishable. For the cuff I used a crochet ribbing made with sc stitches in the back loops only. Take a look at this closeup–you can see the very distinct, stretchy rows of the BLO sc compared with the pebbly and solid griddle stitch.
Let’s get right into the pattern! You can find a PDF version of this pattern on Ravelry here. You’ll need a 3.75mm hook and 1 skein of sport weight yarn (I used Premier Yarns Serenity Garden (Sport) in “Earth”, but I think that particular line is now discontinued).
Griddle Stitch Mitts
Cuff
Ch. 13.
R1: Starting in the second chain from the hook, sc 12. Ch. 1, turn.
R2-38: In BLO, sc across (12). Ch. 1, turn.
To connect the two ends of the cuff: sl st through both layers across (12)
NOTE: The griddle stitch pattern is that you sc in every dc from the previous round and dc in every sc from the previous round. By the nature of this stitch pattern, you’ll have an odd number of stitches for each round and each round will alternate starting with a sc or a dc.
Mitt
Ch. 1.
R1: sc 39 st evenly around the edge of the cuff. (39)
R2-8: (sc 1, dc 1) around without joining at the end of each round. (39)
[alternate which stitch you start with each round to maintain the griddle stitch pattern. Ex: R2 will be (sc 1, dc 1) around, R3 will be (dc 1, sc 1) around, R4 will be (sc 1, dc 1) around, and so on.]
R9: (dc 1, sc 1) in each of the next 2 sts. (dc 1, sc 1) around for the remaining 37 sts. (41)
R10: (sc 1, dc 1) in each of the next 4 sts. (sc 1, dc 1) around for the remaining 37 sts. (45)
R11-17: (dc 1, sc 1) around. (45)
[alternate which stitch you start with each round to maintain the griddle stitch pattern]
R18: Ch. 3, skip first 11, then dc 1 in the 12th st (this creates the thumb hole). (sc 1, dc 1) around. (37)
R19: In BLO of 3 ch. sts: dc 1, sc 1, dc 1. In both loops now: (sc 1, dc 1) around. (37)
R20-24: (sc 1, dc 1) around. (37)
[alternate which stitch you start with each round to maintain the griddle stitch pattern]
Sl st in next st, then fasten off and weave in the ends.
Thumb
Join your yarn to the 1st stitch of R17 of the mitt (at the opening of the thumb hole)
R18 {thumb}: (sc 1, dc 1) in first 11 sts, then dc 1 into the side of the mitt before the ch sts to add one more stitch. In FLO of the 3 ch sts: (sc 1, dc 1, sc 1). (15)
R19 {thumb}: (dc 1, sc 1) around. (15)
R20 {thumb}: (sc 1, dc 1) around. (15)
Sl st in next st, then fasten off. Sew up any gaps where the thumb meets the rest of the mitt, then weave in the ends.
I hope you’ll try out this griddle stitch mitt pattern since it’s very quick and only uses one skein of yarn. It’s a great project for getting back into fall and winter crafting!
lovely pattern, made a super cute and grunge glove! shortened the thumb to fit me a bit better but otherwise the same! loved it. its so cute 10/10 plan to make the second
Hi, thank you for this pattern! I’m working on my first pair but I’m stuck on the thumb part. I have a few questions if you don’t mind answering. First, is the first stitch of R17 included in the first 11 stitches that it says to sc 1, dc 1 into? I also don’t understand the second instruction of dc 1 into the side before the ch sts to add one more stitch. When I try to follow the pattern, the thumb part ends up with holes in some places and I don’t know how to continue into R19. I just don’t know how to get it to look right.
Do you ever video yourself making these mitts? I’m a self taught crocheter off YouTube so not very good at reading patterns.
I’m afraid I haven’t ventured into Youtube so I don’t have video of making the mitts. I do plan to make another pair of these for a photo tutorial in the next couple of months when I can get some time.
Hey! I learned a fair bit from YouTube,for written patterns I found that doing something that’s smaller and easy to see faults in helps you pinpoint where you read it wrong. I write them out (you can print them too if ur able) and if I’m walking away from a longer project I use washi tape and a bit of paper or a sticky note to mark where I’m at! I’d suggest an arrow in case you will forget which part you lined up to where you’re at! Uhm but the flower coaster from hayhaycrochet was the first main one I did. Stitch patterns such as the long wave stitch or even granny stitch can give you a start on understanding how to read patterns. I hope if you see this it’s helpful! I know personally having smaller things I had to make was better because mistakes will be more noticeable.
Love the look of these, can’t wait to try to make a pair! Thanks.
Hi. I LOVE these! Just wondering what size these are considered? Are they considered one size? Thank you and thank you for the lovely pattern.
Thank you so much! I’m glad you like them. 🙂 They’re one-size, and I would say they are about a medium — They might not fit someone with really big hands, and they probably won’t work for children without modifications, but they’re pretty forgiving for most adult hand sizes. If you need them a little larger or smaller, I’d suggest using a thicker or thinner yarn and slightly larger or smaller hook. That works really well with this pattern to adjust the size slightly.
Hi. I love your finger less gloves.im working on the x stitch glove.first time….
Thank you so much!!
This is a fabulous pattern. Now that I’ve tried it once I feel able to adapt for other sizes. Thank you.
Thank you! That’s one of the things I love about the griddle stitch: since it’s just 2 stitches, it’s not too hard to apply it with different row lengths. I wish you luck with your future mitts!
Hi!! I love this pattern and have made some for myself which I use all the time!!
I was looking to make some for my sister but she likes to have the option of turning them into full mittens. Do you have a pattern or any advice for creating a flap that attaches to the outer edge of the glove which can then be folded over to turn it into a full mitten?
Thank you in advance for any help/advice you can give me!!
Love Holly x
Holly, apologies for the delayed reply! I don’t have a pattern for a flap, but I think one way to go about it might be to make a ring with the same number of stitches in one row of the mitt (e.g. Ch. 31, sl st to 1st ch to join into a ring), then you could work around the ring in the griddle stitch pattern until the cylinder is long enough to cover your fingers. At that point, I’d probably switch to plain single crochet and decrease a few stitches each row until you get a small hole that can be sewn up. Then you should end up with a sort of cup shape that’s the same width as the mitt itself, and I think you could sew the edges together or attach it to the mitt with a button. I hope that helps! It’s a great idea to make them a little warmer!
What size hook?
Hi. When do you sew up the cuff please? Right at the end? Or did I miss something? Thanks
Hey, is it possible to make these for a child or are they adult sized?
It’s definitely possible, but would take a little experimenting because the pattern as written is adult-only and will come out too big. You could use the general instructions of the pattern but do fewer stitches and rows on each part, but it would be a little more intermediate to try and do I think.
Thank you for the great patterns.
This looks like a great pattern! Question for you, and I did page through a number of other comments to see if I might find the answer 🙂
What size yarn did you use for an adult version?
Thank you!!
Hello! I have used a light sport weight yarn and fingering weight yarn too and both worked well. So regular medium weight yarn is a little too thick, but most things thinner than that work well. If your hands are on the smaller side, I definitely recommend fingering weight or sock weight yarn. I hope that helps!
Love this pattern! Anxious to get started.
Awesome pattern. Will try it out in the near future. Thanks fir the free pattern. Hugs and take care
Brilliant easy to follow pattern, now a few more pairs in different colours…
Thank you for sharing
Lovely pattern!!! Thank you so much for sharing! Can’t wait to make some quick Christmas gifts.
I have neuropathy and need to wear some kind of gloves most of the time. I’m trying this pattern in fingering weight due to the Texas heat. Thanks for sharing the pattern.
You’re very welcome! I hope they’ll be cool enough and work for your needs 🙂
i’m not sure how to evenly get 39 SCs around the edge of the cuff (when first starting the mitt), since the edge is not smooth and doesn’t have clear sts to insert the hook into. any suggestions?
It can definitely be a little tricky to find the right spot, but you want to end up with roughly one stitch around the edge per each row of the cuff. So I find it helps to look at the ridges on the cuff and try and have 2 stitches between each of the ridges in the ribbing. I hope that helps!
How do you make the colors match on both gloves when using variegated yarn?
Hi Susan, it depends a lot on the yarn you use. If it has consistently repeating color changes, you can usually find a matching spot in the color changes and try and start there for the second glove. For example if you have yarn that changes from blue to red and you start your first glove right where the color changes, you could repeat that for the second glove.
If you start each glove at the same point in the color repeat, they should come out matching. If the yarn you pick is hand painted or more variegated, it might not be possible to get an exact match, but they’ll still be beautiful 🙂
Thank you for this pattern. My granddaughters have EDS and they like the fingerless gloves because their hands cramp up. I hope this helps them in school.
Hi! It’s a very beatiful work! I was just about to knit a pair for me and for my children too and this pattern is very simple to understand 🙂
I need to ask you if the griddle stitch pattern need an odd number of stitches the first and the last stich are the same, both of them sc or db depends de round, is it really so?
Thank you! Yes, it does need an odd number of stitches for the griddle stitch pattern. The first stitch will alternate each row. So for example, if one row starts with sc, the next row will start with dc, and the third row will start with sc and so on. I hope you enjoy! 🙂
Thank you for your reply!! I have finish my first pair for my teenager boy and now I am starting a modified one for me, a little smaller. Sorry for my poor english, and thanks again!!! ?
Hi for the griddle stitch gloves for the cuff do you chain however many to fit your wrist then sl st in the first one to make a ring or do you do something different to start the cuff?
The amount you’ll chain to start the cuff will be the width of the cuff, NOT enough to fit around your wrist. So it’s worked as one long thin rectangle first, which then has the ends slip stitched together to form into a ring right at the end before you start the rest of the mitt.
fun to make and so pretty
Hi, I want to make this for my 1 year old because she likes to suck her thumb and won’t keep normal mittens on. Any tips for making a tiny pair?
Hi Andrea, usually I recommend trying a smaller hook and thinner yarn, but I think to go down to a 1 year old size, you will probably need to adjust the stitch and row counts in the pattern. So I would do fewer stitches on the cuff so it’s not as wide and would work fewer rows for the cuff (basically work rows back and forth until it fits around your daughter’s wrist comfortably), and then pick up fewer stitches in the starting round of the mitt (just make sure it’s an odd number). Then do the split for the thumb and increases wherever feels appropriate. To be honest, I think it would take a bit of experimentation and a lot of trying on the mitts, but it could definitely be done!
Hi any thoughts for making theses for larger hands?
Hi Karen, I think the easiest way is to use a slightly thicker yarn and slightly larger hook and follow the instructions as written. So for example, use worsted weight yarn instead of sport weight and go up one or two hook sized. If you prefer to use the yarn and hook specified in the pattern, you can also adjust try adjusting the stitch counts in the pattern, but it takes a little math and experimentation. So for these gloves, you would work more rows for the cuff, and then more rows in the starting round of the mitt (just make sure it’s an odd number).
Hi how could I adjust the pattern for small hands. Thank you
Hello! For me, the easiest way is always to use thinner yarn and a smaller hook and follow the instructions as written. However, you can also adjust try adjusting the stitch counts in the pattern. So for these gloves, you would work fewer rows for the cuff, and then fewer rows in the starting round of the mitt (just make sure it’s an odd number). I would try the smaller hook and slightly thinner yarn first, like fingering weight instead of sport weight.
when doing the griddle stitch for fingerless gloves does(dc 1, sc 1) mean do both in same stitch, also row 9 do you do the stitch twice in same stitch
In row 9 where it says “(dc 1, sc 1) in each of the next” it means to work BOTH the dc and the sc in each of those stitches, so yes you would do both into the same stitch. Same thing with the beginning of row 10. For other places, where it just says just “(dc 1, sc 1) around” or something similar, you’ll work one in each stitch, NOT work them both into the same stitch. I hope that clears it up a little bit, sorry for the confusion!
For round 18, do you (dc1, sc1) into the three chs? Or do you start round 19 at the 3ch mark?
For round 18, when you ch 3, you will not work any stitches into the chain at that moment. Following the pattern, you continue working into the stitches from round 17 by skipping 11 of them and then working 1 dc into the 12th stitch. So what this will do is exclude those 11 skipped stitches from the rounds moving forward (you basically cut across the circle with the chain, so that a separate hole is formed for the thumb). Once you get to the beginning of round 19, at that point you will work into the chain as specified in the pattern, then continue on with the rest of the round. I hope that helps clear it up, but if you run into any more questions, definitely let me know!
Thank you so much for the pattern. I tried it out and it turned out amazing!!!!!!! I started making a bunch of these for me and my friends and they all love it too.
That’s awesome, thank you so much! I’m glad you like it 🙂
Thank you for the pattern. They are beautiful. I love that textured stitch and can’t wait to try these. Thanks again.
how can I print this pattern, can noot crocket at my computer
I believe to print something from the web, you can try right-clicking on the page, and there should be a print option. You could also copy the text into a Word or Google Doc document and print from there. I hope that helps!
Hi. I don’t understand R2-8, where it says “without joining at the end of each round “.
Hello! Some patterns will ask you to slip stitch to the 1st st when you reach the end of a round, so for these mitts, “without joining at the end of each round” means that you don’t slip stitch at the end. Once you reach the end of a round, you just work the first stitch of the next round per the instructions, without any slip stitch or chain in between. If you run into any other questions, please let me know!
Thanks. Your explanation was very clear.
Is there a way to modify this to make it smaller?
Yes! You can make it smaller by either using thinner yarn & smaller hook, OR by working fewer rows on the cuff and fewer stitches for the rest of the mitt. For example, you could work 30 rows of the cuff instead of 38, and then when you sc around the edge of the cuff to start the rest of the mitt, sc 31 instead of 39. Work all the increases as specified in the pattern and you should be good to go, as long as you have an even number of rows for the cuff and odd number of stitches for the mitt.
Kat, I am in the UK and checked my conversion charts which told me to go out and buy our 4-ply yarn. The mitts cuff are made with 12 stitches, which are 4cm in length. Can you tell me how that is going to fit round anyone’s wrist. I feel this should be super chunky surely to fit? Please advise. Thank you.
Hi Ruth, the 12 stitches represents the width of the cuff, rather than the length required to go around the wrist. You’ll work back and forth rows until you have a strip that is long enough to go around a wrist and then join the ends to form a ring. From there on, you’ll be working into one long side of the cuff for the rest of the mitt. 4-ply yarn should definitely work! I hope that helps, let me know if you run into any further questions!
how large of a skein?
The original yarn I used was a 65 gram skein (185) yards and I used most of it. I made another set with fingering weight yarn (Wisdom Yarns Poems Sock) and used 150 yards from that one.
These are wonderful, thank you! How do I adjust the pattern for smaller hands?
Thank you Debie! I think the easiest way to adjust for smaller hands (depending on how much smaller they are) would be to try smaller yarn & hook and follow the same stitch count. I find that much easier personally 🙂 To make them a LOT smaller, you can do fewer rows on the cuff and a corresponding smaller number of stitches for the first round of the mitt. As long as you have an odd number, the pattern should work out!
Just what I wanted
I am in love with this pattern!! Just finished making the 3rd pair , which is the one I’m keeping because my friends demanded the earlier ones I made! Thanks for an awesome pattern 🙂
Yay!! Thank you so much, I am so glad you like it. 😀
So gonna start these tonight!
Going to try this pattern for my mother, age 88, always cold jand
I love this pattern! I made myself and my fashion forward friend a pair last year. I’m making another pair for a perpetually cold coworker right now.
Thank you!
You’re very welcome! I’m so glad you like it 😀
Thanks for sharing this pattern! I am assuming by sport weight yarn, you mean #3 weight? Any suggestions for using #4 weight? Thanks!
Yes, #3 weight! If you want to use #4 weight or other bulkier yarns, you could use a smaller hook, or you could also do fewer rows on the cuff/fewer stitches per row for the rest of the mitt. With the griddle stitch pattern, as long as you have an odd number in your row the pattern will work out. So for example if you started with 31 around the edge of the cuff instead of 39, and then followed the regular number of increases I think you should end up with the right size, but it may take a little experimentation!
My new favorite pattern. These were so easy and comfortable. I used Lion Brand Cupcake yarn and 4mm hook (I stitch tight). They fit perfectly. The weight is perfect for when my hands get cold at work. I did modify the pattern a little, hope you don’t mind. Mitt R19 I stitched over the chain and then Thumb R18 I did a post st. I may have also put in a dec before and after those 3 sts to close the gaps so I wouldn’t have to do it later. Just make sure you end up with 15 total.
Thank you so much! I don’t mind at all if you modify the pattern, it sounds like a great way to add on the thumb without gaps! I bet they look adorable with the Cupcake yarn. 🙂
I’m kinda new at this crocheting thing, but love this pattern, because it’s not monotonous in the making, so thank you for sharing it! However, I don’t know what you mean by the phrase “without joining” that you refer to in the making of the mitt portion. Do you mean to cut it off, and rebegin with each seceding row?
Often when you’re crocheting in the round, a pattern will say “join at the end of each row” which means that you’ll slip stitch the last stitch of the row into the first stitch, then ch.1 THEN continue with the next row.
So in this case, when it says “without joining” it just means to keep going. You don’t do anything fancy at the end of the row (you don’t need to cut it), you just continue with the next stitch. I hope that helps! Feel free to let me know if you have any other questions!
Hi Thanks for this great pattern can you tell me how many stitches to the inch there is please so that i get the gauge write
For these mitts, gauge should be about 10 stitches and 9 rows = 2 inches in the griddle stitch pattern. I’ve found that thinner sport weight yarn works best for me.
Love the pattern first time I ever attempted to make gloves!
That’s awesome, congratulations on your first attempt! I’m so glad you like the pattern, thank you. 🙂
Sorry if this is a silly question but are you working the mit section in the round or do you work back and forth and then stitch up at the end? Thank you!
It’s not a silly question at all! The cuff is worked back and forth and stitched into a ring, BUT after that when you get to the main part of the mitt, it’s worked in the round. I plan to make another pair and add some more notes soon, because the transition from cuff to mitt is a bit tricky. Essentially for most of the mitt you’ll be working around one side of the cuff in a circle, and continue working in the round for the rest of the mitt.
Thank you so much!
Just starting pattern and questioning only 12 stitches for the cuff
And a small 3.75 hook??! Am I reading this sting?!
Yes, that’s correct! The cuff is worked back and forth on the short edge as one long strip, then it’s joined into a circle. So the 12 stitches is how wide the cuff is, only about 1-2 inches. The sport weight yarn I used for these is pretty thin, I think you could even go down to fingering with the same stitch count. So the small hook helps make a very dense and warm fabric. I hope that helps! Let me know if you run into any other questions!
What kind & how much yarn did you use & what size hook. I don’t see that information anywhere. Thank you.
Oops, looks like I just had them in the PDF on Ravelry, but not the actual post! Sorry about that, I’ve just added that info here. I used a 3.75mm hook and 1 skein of sport weight yarn. The specific yarn I used was Premier Yarns Serenity Garden (Sport) in “Earth”, but it looks like that line has recently been discontinued. Any sport weight or even baby or light worsted yarn should work!
Thank you! Very helpful information.
Thank you for this. I do a lot of fundraising for a local children’s hospice and I am sure these will go down really well.
Thank you! That’s wonderful, I really hope they like them! 🙂
Hey 🙂 Just wanted to say I enjoyed following this pattern, It’s pretty chilly atm in England so this is perfect thanks x
Thank you so much! I’m so glad you liked the pattern 😀