
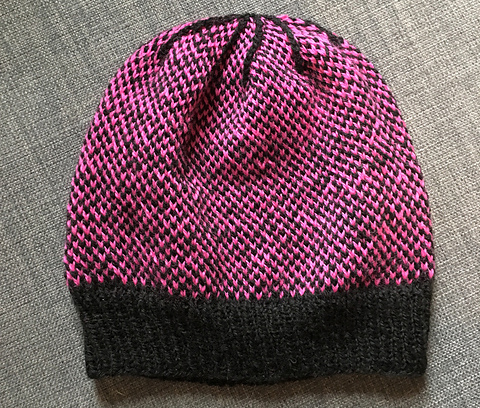
This checkered hat is an easy introduction to stranded colorwork knitting, and the pattern looks great in a variety of colors!
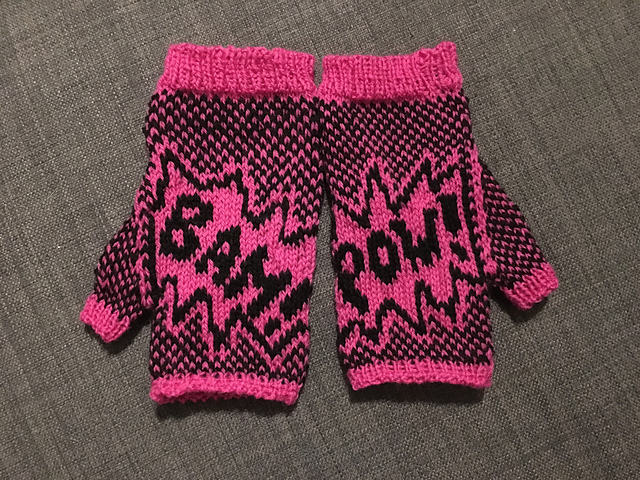
I made this hat as part of a trio of presents for my SO. I had just learned colorwork to make the awesome Fightin’ Words fingerless gloves (pattern here & picture at the end of the post). With the leftover yarn from my 2 skeins of KnitPicks’ Palette, I decided to make this hat as well! The pattern is very simple and easy to pick up, so it’s a great starter project if you’re new to stranded knitting. I would recommend watching a couple of Youtube videos on stranded knitting first if you haven’t tried it before. I always like to warm up with a couple of videos when I’m trying a new technique, and it was especially useful in this case to see how most folks hold their yarn. Personally I found that holding one color in my left hand and the other in my right works best for me.
Let’s get to the pattern for this checkered hat! This hat fits an average adult sized head, about 22-23 inches in circumference.
Supplies
- 3.0mm and 3.5mm circular knitting needles
- 3.5mm double pointed needles for the decrease rounds (or you can use the magic loop, I haven’t learned that one yet, so I stick to DPNs)
- Fingering weight yarn in 2 colors – about 150 yards total. I used about 1/3 skein each of KnitPicks Palette in Black and Cosmopolitan. This is a great project for using up little bits of leftover fingering weight yarn!
Pattern
On the 3.0mm circulars, cast on 112 with your MC (main color) with the long tail cast on, or whichever cast on you prefer for ribbing. Join to work in the round. I like to place a stitch marker before the first stitch of my row to keep track.
Work 1×1 ribbing for 16 rows (or 32 if you want a folded brim), then switch to 3.5mm circulars. Knit 1 round, with 27 increases evenly spaced (about every 3 stitches), 139 stitches total. Join on with CC (contrast color).
Knit around, alternating MC and CC every stitch for 38 rows (139 stitches total on every row). I recommend holding your CC dominant (pink in my case) which means you keep it to the left of your MC, and it’s coming from underneath the MC. It helps make the design pop! If you want a slouchier hat, you can knit more than 38 rows. Next, we start decreasing. I switched to DPNs in the middle of the decrease rows when circulars got uncomfortable, so feel free to do that at any point!
R39: (knit 12, k2tog with MC) 9x, knit 13 (130)
R40: (knit 11, k2tog with MC) 10x (120)
R41: (knit 10, k2tog with MC) 10x (110)
R42: (knit 9, k2tog with MC) 10x (100)
R43: (knit 8, k2tog with MC) 10x (90)
R44: (knit 7, k2tog with MC) 10x (80)
R45: (knit 6, k2tog) 10x (70)
R46: (knit 5, k2tog) 10x (60)
R47: (knit 4, k2tog) 10x (50)
R48: (knit 3, k2tog) 10x (40)
R49: (knit 2, k2tog) 10x (30)
R50: (knit 1, k2tog) 10x (20)
R51: k2tog 10x (10)
R52: k2tog 5x (5)
Fasten off, then sew the yarn end through your remaining stitches and pull tight to close up the hole. Pull the tail through to the wrong side of the hat and weave in.
Tips
Work every decrease in MC and every other stitch in the color according to the set pattern, so you get a pretty spiral pattern at the top.
You’ll have floats on the wrong side of your work as you carry along the inactive color, so try not to pull them too tight, otherwise your hat might be stiff and not stretchy enough to fit properly.
There you have it! A very simple and fun checkered hat pattern. Once you’ve got this hat under your belt, why not try something more advanced, like the aforementioned Fightin’ Words gloves? These are the ones I made with my pink and black yarn:
This hat also makes a quick and easy gift, so it’s exactly the kind of thing I like to do for Christmas. For more Christmas gift ideas, check out my post on Christmas crafting!
Happy hat making!